You have a stackup, a housing envelope, and a mechanical engineer asking for a flex PCB bend radius. The answer is not a lookup table; it is a strain calculation, and the multipliers in the tables are what that calculation returns once you fix a stackup.
Every published multiplier, whether it reads 6×, 10×, 12×, 100× or 150×, comes from IPC-2223’s minimum bend radius equations evaluated at a chosen allowable copper strain. The circulating tables detached the number from the stackup that produced it, and that is why two engineers can both follow the standard and disagree by a factor of thirty.
This article puts the stackup back: the two equations, the three strain limits, the arithmetic that links them to the published multipliers, and how to put the result on a drawing.
flex PCB types, materials and design
Key Takeaways
- A bend radius multiplier is not a rule. It is what you get when you fix a stackup, choose an allowable copper strain, and solve IPC-2223’s equations.
- The standard’s own dynamic worked examples give R/T of 31 for a 185 µm single-sided stack and 88 for a 320 µm double-sided stack, not the 100× and 150× that circulate in the field.
- IPC-2223 Figure 5-7 allows rolled annealed copper under 16% deformation and electrodeposited copper under 11%. That five-point gap is why dynamic flex requires RA foil.
- The 6× static rule is roughly an order of magnitude more conservative than the standard’s own installation-bend equation, which returns an R/T near 0.55 on a thin single-sided stack.
What Is a Bend Radius on a Flex PCB?
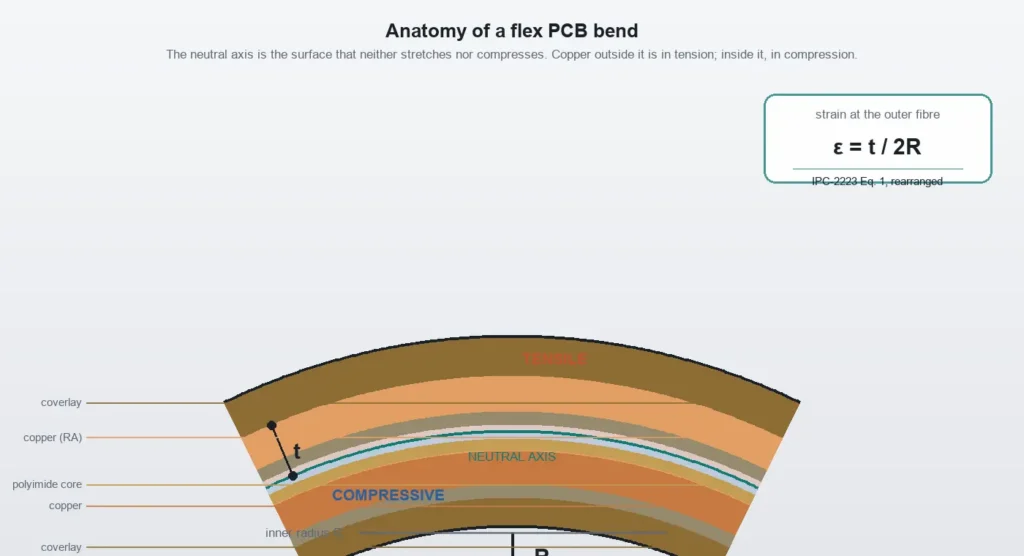
A flex PCB bend radius is the inner radius of the curved section: the distance from the innermost surface of the bent circuit to the centre of curvature.
That surface is where the calculation starts, not where the failure happens. Bend a flex circuit and the neutral axis sits somewhere inside the stack. Material outside the axis stretches; material inside it compresses. The outer foil is pulled toward its elongation limit while the inner foil buckles and delaminates from the coverlay adhesive.
The radius controls strain everywhere in the bend, and the mechanical envelope sets it. In one sentence: the radius scales with total flex thickness, scales with how far the outermost copper sits from the neutral axis, and on a fixed stack the dynamic multiplier lands close to two orders of magnitude above the static one. The standard’s own single-sided example gives R/T 31 against R/T 0.45.
How to Calculate the Minimum Bend Radius
IPC-2223 gives two equations, split by construction. Both work in micrometres.
IPC-2223 §5.2.3.4.1, single-sided with coverlay (Eq. 1):

    R = (c / 2) × [(100 - E_B) / E_B] - D

IPC-2223 §5.2.3.4.2, double-sided with coverlay (Eq. 2):

    R = (d / 2 + c) × [(100 - E_B) / E_B] - D

    R   = minimum bend radius, µm
    c   = copper thickness, µm
    d   = dielectric thickness in the flexible clad material, µm
    D   = dielectric thickness including adhesive, µm
    E_B = allowable copper deformation, %
These were read from the November 1998 base revision of IPC-2223. The current revision is IPC-2223F, dated May 2026, and the publisher’s current-revision listing is where to confirm which edition your fabricator builds to. Clause numbering has changed across revisions, so verify against a licensed copy. This article does not claim the text is identical in F.
D is subtracted because R is measured at the innermost surface, while D is the dielectric and adhesive between that surface and the copper. Thicker material under the copper puts the foil further out at the same inner radius, so a smaller R produces the same strain.
E_B takes three values: 16% for a single crease in rolled annealed copper, 10% for installation bending (flex-to-install, tied to the minimum elongation in IPC-MF-150), and 0.3% for repeated motion. Those three numbers are the only thing separating the multipliers.
Define T first. T is the sum of the base film, every copper foil, every adhesive or bondply layer, and the coverlay on both sides, measured in the bend region. It is not the nominal substrate thickness on the data sheet, and it is not the thickness at the stiffener, which is thicker by design and irrelevant to the bend. Two engineers disagreeing by a factor of two have almost always defined T differently.
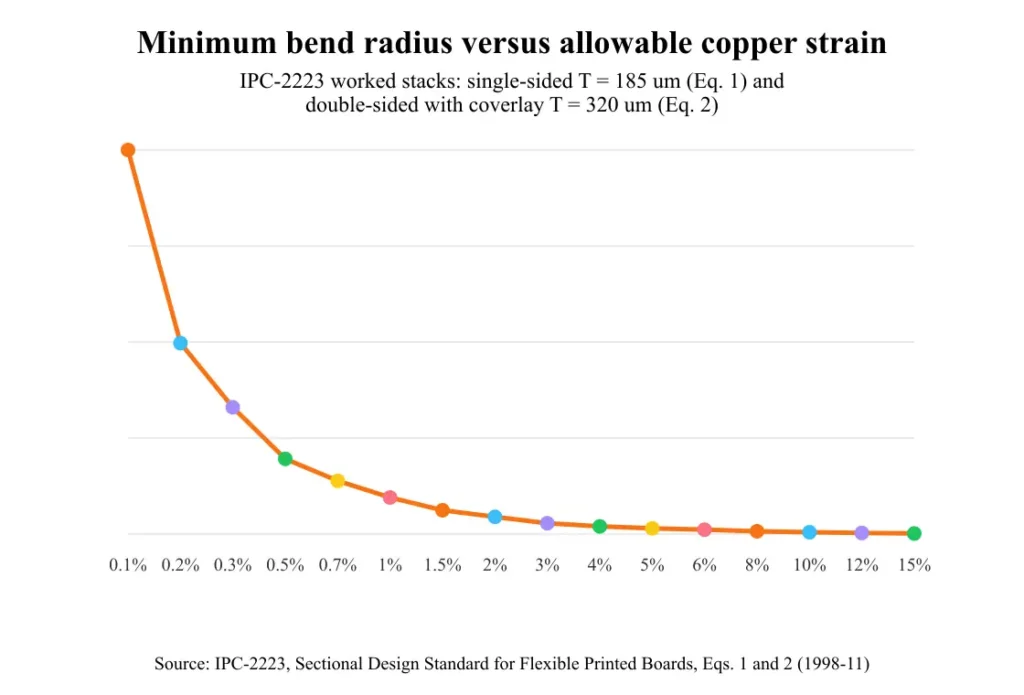
Take the standard’s single-sided example: 50 µm polyimide base, 25 µm adhesive, 35 µm copper, and coverlay with its adhesive. That is T = 185 µm, c = 35 µm, D = 75 µm. At E_B = 0.3%, Eq. 1 returns 5,741 µm, or 5.74 mm, an R/T of 31.
Take the double-sided example: a 50 µm polyimide core, two adhesive layers, two 35 µm copper foils, coverlay on both faces. That is T = 320 µm, d = 100 µm, c = 35 µm, D = 75 µm. At 0.3%, Eq. 2 returns 28,173 µm, or 28.17 mm, an R/T of 88.
Hold that stack fixed and change only the application. At the 10% installation limit, Eq. 1 returns 82.5 µm, or 0.083 mm, an R/T of 0.45. The geometry did not move; the answer moved by a factor of 69. A flex-to-install bend and a dynamic hinge are different design regimes.
That 0.083 mm is below anything you can form and inspect reliably, and the equation does not care. On a thinner stack the first term falls further, and D can exceed it, at which point Eq. 1 returns a negative radius. That is not an arithmetic error: it means the strain limit is no longer binding, because copper that thin tolerates almost any radius the process can produce. Read a negative result as “not the governing constraint” and set the drawing value from what the tooling and the coverlay will survive without creasing.
Report the diameter with the radius. A 5.74 mm radius is an 11.5 mm minimum bend diameter, and the mechanical engineer sizing the housing thinks in diameter, because that is the gap between two walls. Then add 20% to 30% for production: T varies with adhesive flow and lamination, and the formed radius carries its own tolerance. The 5.74 mm result becomes 6.9 mm to 7.5 mm.
Run the calculation on the finished stack, not the design intent. Coverlay adhesive flows during lamination, so the finished T sits a few micrometres above or below the nominal sum, and a fabricator quoting a build will give a finished thickness range rather than one number. Use the top of that range for a dynamic part. The radius scales linearly with T, so a 5% thickness overrun is a 5% radius overrun, and on a 28 mm dynamic radius that is well over a millimetre of housing nobody budgeted for.
Why the Multiplier Changes: The Strain Math
The equations are not empirical fits. They are the geometry of a bent beam written in the standard’s notation, and the rearrangement is short enough to do on a whiteboard. Bend a layer of thickness c so its inner surface has radius R. The neutral axis sits at R + c/2, the outer surface at R + c. The outer arc is longer in proportion to the radii, so strain at the outer fibre is (c/2)/(R + c/2), which reduces to c/(2R + c). Set that equal to E_B/100 and solve:
R = (c / 2) × [(100 / E_B) - 1]This is Eq. 1 with D removed. Add the dielectric offset back, because R is measured at the inner surface rather than at the copper’s inner fibre, and you have the standard’s equation exactly. The familiar relation epsilon = t/(2R), with t the distance from the neutral axis, is the same statement in approximate form: set t = c and invert, and you get (c/2)(100/E_B), which is the standard’s own expression without the small exact-form correction. The derivation belongs to IPC-2223. The point is that the equation is already the strain relation.
So a multiplier is the factor (100/E_B – 1) at a chosen strain, scaled by how far the copper sits from the axis and divided by total thickness. For the three limits that factor is 5.25, 9 and 332. Moving from 10% to 0.3% multiplies it by 37 before any geometric term changes.
The limits come from IPC-2223 Figure 5-7, which gives maximum deformation under 16% for rolled annealed copper and under 11% for electrodeposited copper. That gap answers the question designers ask most often about dynamic flex. RA foil is not preferred because of folklore about grain structure; the standard allows it roughly 45% more deformation before the copper is considered failed, and at 0.3% per cycle that margin separates a hinge that survives qualification from one that cracks.
Keep those base-foil figures separate from the plated-copper recommendations in §4.3.1.1 and §4.3.1.2, which give 12% and 18% elongation for electrolytically plated copper in through-holes, measured per IPC-TM-650 Method 2.4.18.1. They are different quantities on different features and they are not interchangeable with the RA and ED limits. A bend region contains base foil, not plated barrel, so Figure 5-7 is the figure that governs the radius.
One inconsistency is worth flagging rather than smoothing over. Figure 5-7 shows about 3% for installation bending, while the §5.2.3.4.1 worked calculation uses 10% for the same case. The two do not agree, and this article does not resolve which is intended. The 10% figure is the more permissive one, so a design built to 10% carries less margin than the number implies. Read 3% as conservative when the bend is formed once and must not crack in the field.
Layer count enters through the same lever arm. Each added layer moves copper further from the neutral axis and adds stiffness, so strain at the outermost foil rises at an unchanged radius. A 300 µm four-layer stack with 25 µm coverlay puts its outermost copper about 125 µm from the axis. At E_B = 0.3% that requires R = 41.5 mm, an R/T of 138.
The neutral axis also does not sit at mid-plane in an asymmetric adhesive-based stack. Adhesive is softer than polyimide and the copper distribution is uneven, so the axis shifts toward the stiffer side. The distance to the outermost copper is larger than a symmetric calculation suggests, and the true strain is higher than the geometry implies.
Now the finding that changes how you read the field’s static rules. On a thin single-sided stack of 25 µm coverlay, 12 µm adhesive, 18 µm copper and a 25 µm base film, T = 80 µm, c = 18 µm and D = 37 µm. Eq. 1 at the 10% installation limit gives R = 81 – 37 = 44 µm, an R/T of 0.55. The 6× rule applied to the same 80 µm gives 480 µm. At that radius the outer copper sees about 1.9% strain against a 10% allowance, roughly a fifth of what the foil will tolerate. The static multipliers are conservative rules of thumb, not the standard’s minimums. The margin is not wasted, because hand forming and laminate variation are real, but you should know you are choosing it.
polyimide base material properties]
Which Multiplier Applies to Your Build
The right-hand column is the R/T that IPC-2223’s equations produce for a representative stack, not a range invented for this page.
| Condition | Published figure | What the equations give | Use |
|---|---|---|---|
| Static, single or double-sided, one-time install bend | 6× to 10× | R/T 0.45 to 0.55 at the 10% installation limit | The published figure is conservative. Either works; 6× is the safe default |
| Static, three layers or more | 12× to 24× | Depends on stackup; must be calculated | Calculate it |
| Dynamic, single-layer | 100× | R/T 31 at E_B 0.3% | 100× is close to the standard’s own result for a 185 µm stack |
| Dynamic, double-layer with coverlay | 100× to 150× | R/T 88 for the standard’s 320 µm stack | 150× is conservative; 100× is defensible for a thin stack |
| Dynamic, three layers or more | 100×, or “not recommended” | R/T 138 for a 300 µm four-layer stack | Do not. Use unbonded flying leads or a rigid-flex transition |
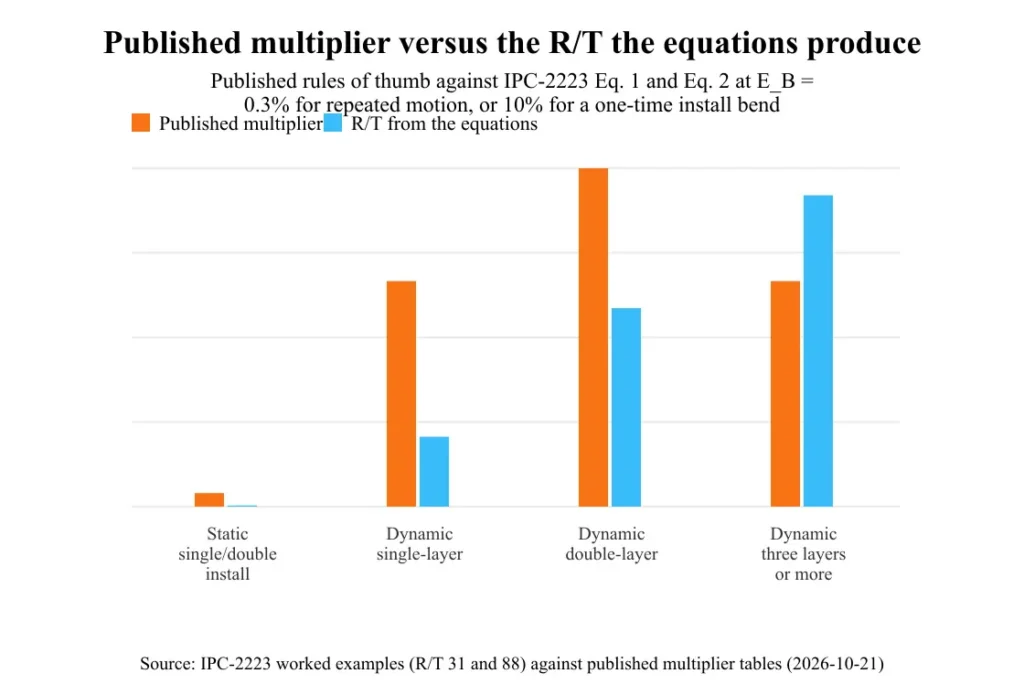
The 100× and 150× figures did not come from nowhere, but they came from somewhere narrower than their reputation suggests. The standard’s worked examples give R/T 31 for the 185 µm single-sided stack and 88 for the 320 µm double-sided stack at 0.3% strain. The round numbers are those results rounded up and detached from the stackups that produced them. Read 100× as a summary of the single-layer dynamic case and 150× as a summary of the double-layer case. Read neither as a law that holds when your copper is 2 oz or your stack has four layers.
The decision rule:
- One-time installation bend, one or two layers: 6× is safe, 10× is safer. The standard permits less. Use the larger number when the bend is formed by hand.
- One-time bend, three or more layers: calculate it. The tables stop being informative on a thick or asymmetric stack.
- Dynamic, single copper layer: 100× on T, checked against Eq. 1 at 0.3% and against the cycle life you need.
- Dynamic, double layer with coverlay: 150×, unless your stack is thin enough that the equation returns less and you have test data to support it.
- Dynamic, three or more layers: do not bond the bend region. Use unbonded flying leads, or a rigid-flex transition with one or two flex layers.
Two published positions need correcting before you rely on them.
The Siemens article on rigid-flex bend design states that dynamic flex needs a radius of at least 10× the flex material’s thickness. Every other published source gives at least 100×, and the standard’s own dynamic example on a 185 µm stack gives R/T 31. A 10× rule sits an order of magnitude below the standard’s result and one to two orders below the rest of the industry, and following it produces a hinge that cracks the outer foil after a few cycles. The figure looks like a static or form-once condition presented as a dynamic rule, which is how it will be read.
The second correction is closer to home. The general flex PCB guide on this site quotes 20× to 40× for dynamic single-layer and 30× to 50× for dynamic double-layer. Those are lower than the published consensus and the standard’s worked examples, and they hold only if a substantially shorter cycle life is acceptable. Unless cycle-test data on your own stack supports a smaller radius, use the higher number: the earlier guidance is superseded by the calculation, not an alternative to it.
Every multiplier carries two conditions whether the source states them or not: the copper type, RA or ED, and what the thickness figure includes. A multiplier quoted without them is not a specification.
Total Flex Thickness and Stackup
Because the radius is proportional to T, the fastest route to a tighter bend is usually a thinner stack rather than a more compliant one.
| Layer | Static flex | Dynamic flex |
|---|---|---|
| Copper foil | 18 to 35 µm, RA or ED | 9 to 18 µm, RA only |
| Polyimide base film | 25 to 50 µm | 12.5 to 25 µm |
| Adhesive or bondply | Acrylic, 12 to 25 µm | Adhesiveless preferred; epoxy if bonding is required |
| Coverlay | 25 to 50 µm per side | 25 µm per side with thin adhesive |
Standard foils are 9 µm (quarter ounce), 12 µm (third ounce), 18 µm (half ounce), 35 µm (one ounce) and 70 µm (two ounces). The 12 to 35 µm band is the production mainstream. Going to 9 µm buys a smaller radius and costs current capacity and handling robustness. Going to 70 µm for power in a bend region doubles the copper term against 35 µm, and the radius with it.
Copper type is not a preference in a dynamic build. Figure 5-7 allows RA under 16% and ED under 11%. At 0.3% per cycle you are far below both, but the gap governs how much process variation the part tolerates. Use RA for anything that moves repeatedly. For static flex, ED is acceptable and cheaper, and many fabricators default to it unless the drawing says otherwise.
Adhesive follows the same logic. Acrylic flows well and forgives lamination pressure; epoxy is stiffer and more dimensionally stable. For dynamic work the better answer is usually to remove it. An adhesiveless construction bonds copper directly to a cast polyimide film, eliminating a layer that creeps under cyclic load and cutting thickness at the same time. IPC-4204C is the material specification for the flexible metal-clad dielectrics these constructions use.
Do that trade explicitly. At a 100× multiplier, 25 µm of adhesive is 2.5 mm of radius and 5 mm of bend diameter. A designer who needs 5 mm of diameter back can often find it by deleting an adhesive layer rather than by opening the enclosure.
Keep vias out of the bend. JLCPCB’s “Flexible PCB Bend Radius: Design Guide & Rules” recommends 1.0 mm of clearance from the bend zone for static flex and 1.5 mm for dynamic. A via is a hole through the neutral axis with a copper barrel in it, and the barrel has almost no compliance in the direction the bend is pulling.
flex PCB manufacturing capabilities]
Bend Length, Tangent Length and Transition Zones
There is no published numeric minimum for the straight tangent section before or after a bend in IPC-2223. The word “straight” does not appear in the standard in this context, and “Tangent Corners” is only a figure label, not a dimensioned requirement. Anyone quoting a tangent length as an IPC value is quoting a fabricator’s practice.
The fabricator rules that do exist are useful. Eurocircuits’ guide to designing flex-to-install PCBs gives bend-zone length as L = (2π × bend radius) × (bend angle / 360), the arc length of the bend. One 180° bend at 5 mm radius consumes 15.7 mm of bend zone. The length scales with the number of bends, and that sum is often larger than the space the mechanical team allocated.
JLCPCB puts components and stiffeners at least 2.5 mm from the start of the bending region, and GCA Flex terminates stiffeners at least 1.5 mm from the bend zone start. Both make sense: a stiffener is a step change in flexural rigidity, and a bend starting at a rigidity step concentrates strain there.
Coverlay openings follow a different kind of rule. IPC-2223 §5.2.3.3 states that the circuit shall not be flexed or formed in an area where there is a discontinuity in the covercoat. That is a prohibition, not a dimension. There is no millimetre figure attached because in the standard’s model the correct distance is zero: you do not bend there. The 0.5 to 1.0 mm figures circulating from fabricators are DFM margins around that prohibition, sized to keep the bend clear of the stress concentration at an opening’s edge. They are good practice. They are not standard values, and quoting them as such invites an argument you cannot win.
The layout rule that follows is to stagger the discontinuities. The stiffener edge, the coverlay edge and the copper transition should not sit on the same plane across the bend region, so no single cross-section carries all three rigidity changes. Zoned construction is the practical version: build the bend as plain flex with coverlay both sides and no stiffener, no plated hole and no copper pour, and let the stiffeners and connectors live at the ends.
rigid-flex transition zone design]
How to Specify Bend Radius on a Fabrication Drawing
Put the number in a dedicated bend-region note or a bend table, not in the general tolerance block. A general tolerance applies to a feature the fabricator measures; a bend radius governs how the part is stacked, formed and tested.
Say which side the copper is on. A bend puts one foil in tension and the other in compression, and in a double-sided stack the outer foil is the one that cracks. If the assembly can be flipped, the drawing should say so, because a bend direction that puts the less critical copper layer outside is free margin.
Express both radius and diameter, with a tolerance. A production recommendation, not a standard value: ±0.1 mm or ±10%, whichever is greater. The percentage covers larger radii where a fixed 0.1 mm is unrealistically tight; the absolute figure covers small radii where 10% is too coarse to inspect.
The number alone is not a specification. It needs its context: the total thickness T used in the calculation, the bend angle, the direction of bend relative to the copper layers, whether the bend is static or dynamic, the target cycle count for a dynamic part, and the copper type.
A callout you can copy:
BEND REGION - SEE DETAIL B
  Minimum bend radius: 7.5 mm (diameter 15.0 mm), ±0.1 mm / ±10%
  Calculated per IPC-2223 Eq. 2 at E_B = 0.3%
  Total flex thickness T = 320 um (see stackup table)
  Bend angle: 180 deg, copper on outside of bend
  Application: DYNAMIC - 100,000 cycles, verify per IPC-TM-650 2.4.3
  Copper: rolled annealed (RA), 35 um
  Keep vias and stiffeners >= 1.5 mm from bend zone boundary
flex PCB manufacturing capabilities]
How Bend Radius Is Verified
A specified radius is a claim about endurance, and endurance is demonstrated by test rather than by geometry. The method is IPC-TM-650 Method 2.4.3, “Flexural Endurance, Flexible Printed Board Materials”, which determines the number of flexes to conductor failure. It originates with the Flexible Circuits Test Methods Subcommittee (D-15).
Be careful with the failure criterion. The method as published counts flexes to conductor failure, meaning an electrical open. Several vendor pages attribute a “10% resistance increase” criterion to it. That is a common misattribution. If resistance-rise criteria apply on your programme, they come from the applicable specification or drawing.
The method does not fix the test conditions either. Bend radius, stroke, cycle rate and specimen geometry for a given part are set by the applicable specification and drawing. A page publishing a universal cycle count for “a flex PCB” is describing its own test.
IPC-6013, the qualification and performance specification for flexible and rigid-flexible printed boards, is where flex endurance qualification is required, with the cycle count and bend radius specified by the applicable use category and performance class in the contract or drawing. Vendor sources that publish a cycle-count table attributed to IPC-6013 contradict each other and none cites a clause, so this article does not reproduce one.
Finally, IPC-A-600 is an acceptability and inspection standard, not a design standard. It defines defects such as conductor cracking and delamination in the bend area, and an inspector can reject a part against it, but it prescribes no geometric minimums. Using IPC-A-600 to answer “what radius do I need” is a category error.
IPC-A-600 acceptance criteria]
Frequently Asked Questions
What is the minimum bend radius for a flex PCB?
It is calculated from your stackup, not looked up. For a one-time installation bend, Eq. 1 at the 10% limit returns an R/T near 0.45 to 0.55 on a thin single-sided stack, so 6× is a safe practical figure. For repeated motion at 0.3%, the standard’s own worked examples give R/T 31 for a 185 µm single-layer stack and 88 for a 320 µm double-layer stack with coverlay.
What is the minimum bend radius for a double-sided flex PCB?
IPC-2223’s worked example for a 320 µm double-sided stack with coverlay gives R/T 88 for dynamic flex at 0.3% strain, which is 28.17 mm, and R/T 2.15 for a one-time installation bend at 10%, which is 0.69 mm. Both assume rolled annealed copper. With ED foil the allowable deformation drops from under 16% to under 11%, and the margin goes with it.
Can a multilayer flex PCB be used for dynamic bending?
Not with the bend region bonded. A 300 µm four-layer stack puts its outermost copper about 125 µm from the neutral axis, and at 0.3% strain that requires a 41.5 mm radius, an R/T of 138. That will not fit most products, and thinning the stack far enough to fit it defeats the reason for four layers. Route unbonded flying leads across the hinge, or put the bend in a rigid-flex transition with one or two flex layers.
How many times can a flex PCB bend?
Cycle life is a property of a design, not a material, and it is established by test rather than quoted from a table. IPC-TM-650 Method 2.4.3 measures flexes to conductor failure, and the conditions and acceptance count come from the applicable specification and drawing. A published cycle count not tied to a stackup, a radius and a test condition is not a design input.
Does bend radius change with temperature?
Yes. Copper’s elongation and the adhesive’s modulus both change across the operating range, so a radius safe at 20 °C carries less margin at the top of the range. Adhesive-based constructions are more sensitive than adhesiveless ones because the adhesive softens and creeps. Specify for the worst-case service temperature, which for a part near a power stage is not the ambient figure on the label.
What is the difference between bend radius and bend diameter?
Radius runs from the centre of curvature to the inner surface; diameter is twice that, measured across the full bend. A 5 mm radius is a 10 mm diameter, and a drawing that says “5 mm bend” without saying which is ambiguous. Specify both: the mechanical engineer sizing the gap thinks in diameter, and the design equation works in radius.
Conclusion
The multiplier in the design guide is a strain calculation with the stackup stripped out. Put the stackup back: sum T in the bend region, choose the strain limit for your application (16% for a single crease in RA copper, 10% for installation, 0.3% for repeated motion), and run Eq. 1 or Eq. 2. Then add 20% to 30%, report radius and diameter together, and put both on the drawing with the copper type, the bend direction and the cycle count.
If the answer does not fit the envelope, the fix is usually a thinner stack or fewer layers in the bend, not a smaller number in the note.